Showing posts with label Panther. Show all posts

01 July 2012

Final Solution to the Panther G Question

Well anyone that has been following the Panther G drama knows that I have been whining and crying like a little girl about the one thing about them that I didn't like, the skirts not being able to be attached. For me, it was a huge enough issue to ruin the entire set because the only reason I bought them was to have panthers WITH skirts and NO zimmerit. Anyway, I have created a tutorial to show you how to get them to look good with the skirts. The first tank took me maybe 3 or 4 hours to do but this second one I did for the tutorial maybe took me an hour and a half. Beware, this tutorial is long winded and thorough.

First you will need a Panther G, a super sharp hobby blade, some filler, super glue, and some patience. I have converted many things in the past but I am what I would consider a barely competent modeler so care needs to be taken in this tutorial or you will stab yourself and bleed everywhere. I can in no way be held responsible for anyone injuring themselves while using this tutorial.


I would not trust your standard hobby blade. I went to Walmart and in the arts and crafts section for a couple of bucks they had these special blahblahadmium coated blades that are supposed to stay sharper longer. I tried them out and not only do they stay sharper longer, they are SHARPER. I accidentally dropped one while sitting down and it stuck into my thigh! Don't you stick that knife in your leg Ricky Bobby.


Now it would be better if you didn't put your tank together. If, like me, you were one of the first people to get these, then you already put them together and must now rip the tracks off. Do that now. Don't worry if you break the backing on the tracks but worry if you break any part of the tank so be gentle and increase force until it gives way.


Again, if you are working with an unassembled tank, skip this step. If you had to rip your tracks off go ahead and scrape the superglue off the hull or use a dremel to grind it off. The flatter the better.


Now take your tracks and lay them so the outside is facing you. Take your hobby knife and carefully score the backing by gently pulling the knife along the top of the tracks. Keep doing this adding more and more force each pass until the upper backing has been trimmed off.


You should now end up with tracks that look like this.


Now we are going to remove the rest of the backing. First you will need to locate the nub at the front of the track. This little nub is all that will remain on the tracks to help you align them correctly on the hull so it is imperative that the nub remains intact. Take your knife and gently push down next to the nub to cut into the track backing. The cut should be as deep as the backing.


Next stand the track up so you are looking at it from above. You can clearly see a mini trench running in between the backing and the track you want to keep. As with the other part of the backing above, gently drag your knife along the plane you wish to cut to score it, using the tracks as a straight edge reference. I have marked it in red. Do this along the entire track but DO NOT cut off the nub.


Repeatedly drag the knife along applying more and more force until the backing begins to give way. As you get closer to the nub at the front of the tracks it would be smart to be much more careful and gentle about what you are cutting away.


At this point I have removed the vast majority of the backing but observe how the nub is still intact! When you get close to the nub it is best to use your thumb to push the blade into the material you want to remove and to remove less material at a time. By doing this, you maintain perfect control of your blade and will not cut off the nub or turn your finger into a nub in the process. Notice my nub is intact but there is quite a bit of backing left around it. That part comes next.


Okay now you will take your knife and push it with your thumb along the backside of the track to remove material and get it to be flat and level. The flatter and more level you can get it, the better the track will attach to the hull later. Just be sure not to remove too much material and ruin your track.


Notice how at this point I am shaving off material rather than really cutting or gouging it off. This is the detail portion of the conversion.


Near the nub you are going to want to shave off enough material until a hole appears. This hole will appear between two road wheels on the outside face. When the hole appears, you have completely removed the backing here and are guaranteeing a flush fit to the hull.
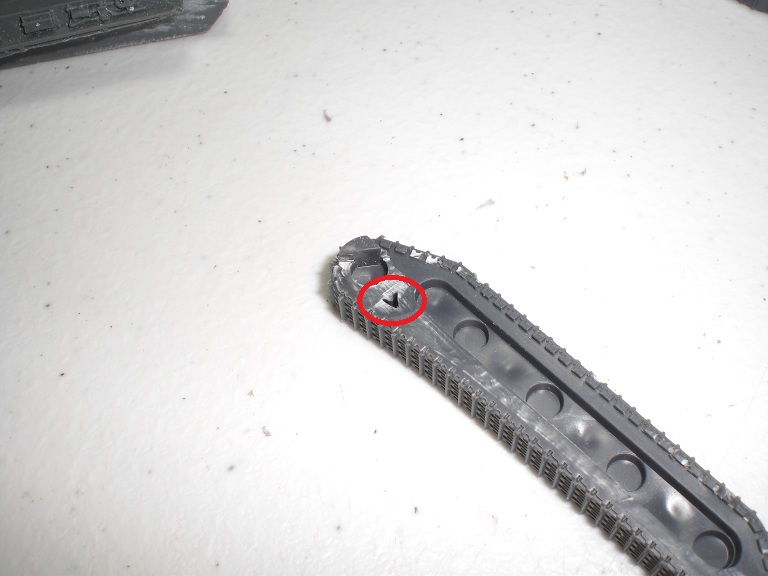

If you look at your track from above you may be able to see some imperfections still. At this point take a hobby file, a dremel tool, or fine grit sand paper and smooth the surface down to get it as flat as you can.


The track is now ready to glue to the tank. Here is the before and after of the left track.


Do a dry fit to the hull to make sure the track is not visible from above the tank at the rear. The tracks will stick out at the front and be visible because the skirt brackets on these pre-remastered hulls are deformed, hence why we have to go through all this.


Now glue the tracks on but keep in mind that because you removed the backing, the track will not have only one way to fit on. Align the nub with the nose of the tank as normal but at the rear of the tank you will have to manually provide a gap between the top of the track and the bottom of the hull.


As long as the hull looks about parallel with the flat bottom of the track the tank will come out looking good and not look as though it is tilted forward or backward. After I glue the tracks on, I like to flood the bottom with superglue just to be sure. Since you removed a hell of a lot of the material used to glue the tracks on, I regard this step as a necessary evil to prevent breakage in the future.


Next glue on your fenders.


Since I am gluing on my skirts prior to painting, I like to prime the bare parts that will be hidden with thinned Vallejo Black. I would advise puting the skirts on now since you may ruin your paint job if you attach them later, or at least need to redo some of it.


NOW GLUE YOUR SKIRTS ON!! We're almost done and now you can start to reap some of the benefits. Glue the skirts on so they are flush with the rear end of the skirt bracket. This will cause part of the skirt to be glued directly onto the fender. This is good because not only will this strengthen the fender in the long run but also provides the frontal contact point for gluing so that the skirt remains stable during the next steps. Note how gluing the front to the fender also creates the gap I bitched so much about. This is good. Before our modifications it was the tracks creating the gap. Now, the fenders properly cover the tracks.


Next grab whatever you have for filler be it hobby putty, green stuff, contour putty, or whatever. I don't have access to hobby stores so I use Walmart for most of my hobby stuff and don't pay the markup you may pay for "specialized" hobby products. Many hobby products are simply common cheap products that have been rebranded for hobbyist use. I am using a $3 tub of drywall spackling.


Using whatever you feel like, apply your filler into the gap. Make sure you put enough in to span the gap and maybe go down into the gap just a tiny bit to ensure there is enough material there. Take care to not get too much of the stuff on other parts of the tank because you will have to scrape it off next.


Now use a knife or something to scrape off the excess filler. I did this after letting it dry for about 10 minutes. In that time it is still soft but not brittle so I can remove excess without chunking some out of the gap. If using a knife I like did to scrape, hold the blade perpendicular to the track so that you aren't accidentally cutting anything off.


Next I like to put superglue on the filler after it has dried for maybe 20-30 minutes. You can skip this part if you like but it has two purposes. First it seals the filler and makes it rock hard. Second it creates a nice smooth flat surface not too unlike the surrounding resin which makes the repair look more natural. If you're unsure about this, try it out on something else and you'll see what I mean.


YOU'RE DONE! Finish up the build by gluing the rest of the tank together and attaching whatever bitz and gubbinz you feel like sticking onto it.


After priming, this is what my first tank looks like. I hope someone finds this information useful and I hope Battlefront learns their lesson. I realize this is a total pain in the ass but at least you can salvage this kit.


Thanks for looking!

28 June 2012

Front Page at Battlefront!

It's Thursday, update day, at Battlefront and I must say it is an amazing week for me! Product spotlights are out for a whole slew of new stuff in preparation for Devil's Charge. First up is something I have eagerly anticipated since March when I finally got into FoW. We get Konigstigers WITHOUT zimmerit and the world's first operational (Me-163 wasn't used in combat as far as I know) jet fighter, the to-this-day ultra sexy Me-262!


Next the Americans get a huge release of loving from BF. There's Chaffees and Calliopes and winter troops oh my! There's also this crazy thing I've never heard of called a Xylophone which is pretty much two Calliope rocket launchers mounted in a single truck! These sculpts are amazing!


Battlefront is also releasing apartment buildings now for those of you without the time, ability, or want to make your own terrain. I prefer to make my own terrain but the quality of these buildings are really making me want to just buy theirs.


For pictures of everything, head over to Battlefront's site at http://www.flamesofwar.com/ or to the product preview page at http://www.flamesofwar.com/hobby.aspx?art_id=3344 to see all the glorious stuff going on.

Finally, a few posts ago right before my Panther G debacle started, I had made a post on this blog and on Battlefront's modeling forum about how I used the spare Jagdpanther plastic barrel from the Panther G boxed set to modify my Konigstiger barrel. This post has made the FRONT PAGE at Battlefront and is this week's modeling tip! It is an honor to be featured here and I hope to come up with more great stuff in the future. You can view my blog post here or view the original thread at http://www.flamesofwar.com/Default.aspx?tabid=126&aff=9&aft=543772&afv=topic. Needless to say, I am elated by this. I followed up that thread with a few more pics of the conversion and am including them here for convenience and or posterity.


Thanks for the views!

**Coming Soon** Review of FOUR different kinds of epoxy putty you can get at Walmart for $4 or less per tube to create extra stowage and pictures of those finished Spetsnaz I promised (college biology class is whuppin my ass /sadface)

21 June 2012

Panthers Remastered

I had sent off an email to Battlefront telling them about the issue with the Panther G tanks. This was the response I got.

I'm sorry to hear of your displeasure with your recent purchase. As of this morning, I have sent an email to our production staff to see if there is anything we can do on our end. As soon as I hear back from them, I will let you know what their response is. It is likely, if action is taken on our end, that it will take some time to see a resolution on this as it will probably involve remastering the hull of these kits.
It seems as though the issue here lies with how the tracks mount to the underside of the resin hull piece. Have you tried filing down the underside of the hull?

I wasn't about to be having any of that. When I buy a product I shouldn't have to grind it down just to get it together to fit properly. The point is moot anyway since my tracks are already glued on.

I've had a forum thread open about this issue on BF's site for a week and BF Evan has finally responded to the thread with this information.

Posted By Evan At Battlefront on 21 Jun 2012 04:32 PM
Hi guys, sorry to take so long to reply but I've been a bit distracted on a couple of other projects! I see whats going on and the Panther hulls have already been remastered to suit the new plastic tracks so the hulls here are the metal track orientated ones still coming through. The quickest way to get the right look with these hulls is to actually trim the backplate of the plastic tracks( don't try the resin hull..) with a sharp knife or sandpaper - I used a sharp knife and each track took me about a minute to carefully remove enough of the backplate. The Panther G hull is wedge shaped and narrows towards the front so the rail, the skirt hangs off, should be slightly wider at the front, after the tracks are on, and the skirts are glued on at the rear, back fill the gap at the front to complete the rail. Please let me know how you get on.

cheers,

Evan

So here is confirmation that the hulls have been remastered and once again I am being told to rip the PLASTIC tracks off and cut them up just to get them to fit. Interestingly enough, despite Evan saying that the tank is supposed to be wedge shaped, it is Thursday, update day, at BF and they have a quide to painting the camo on these. Their pictures contradict Evan.

Here is their Panther from the Panther G platoon web article. This vehicle is showing the skirt gap issue.


Now here is how the Panther is SUPPOSED TO LOOK, also from this same new painting article on their mage page.


Notice how the skirt mounting bracket is perfectly parallel to the tracks at all times? THIS is a Panther.

The new article on how to paint the camo scheme on these can be found at http://www.flamesofwar.com/hobby.aspx?art_id=3329

19 June 2012

Updates, Repairs, and Despair

Still trying to figure out a way of attaching these Panther G skirts. I super glued the rear end on and then attempted to use some of my epoxy putty to bridge the gap but the putty just isn't cooperating with me. The skirts are on, I just have to make it look good now since that is too much to ask of BF.


Next, the staff car I got in my Flak36 boxed set had a miscast base. Something I really hate about most of the transport vehicles in this game and the Panzerwerfer and Katyusha boxed sets is that the vehicle is molded onto the base. This is all good and gravy unless you either don't really want the base on (if for some reason you wanted to field Panzerwerfers without 5 or more crew), the base is damaged (which happens all too often), or if like me you simply hate all that resin under the vehicle that shouldn't be there. Since the staff car is a cheap replacement in case I screwed it up, I set out to test out what I could do about the damaged base. Here is how it looked before.


I got my dremel out and cut off what I could with a cutoff wheel. I then used a cutting bit to chunk out more of the larger material. Finally I used a grinding wheel to core it out and smooth it over. The only bad part about this process is the wheels are now flat at the bottoms (not such a big deal if you're mounting it on a new base with grass), and it is extremely time consuming. Honestly, I would rather pay more for the Panzerwerfers and support vehicles that aren't cast onto their bases than deal with anymore resin dust. I think it turned out ok. At least this vehicle won't have a mishapen base anymore.


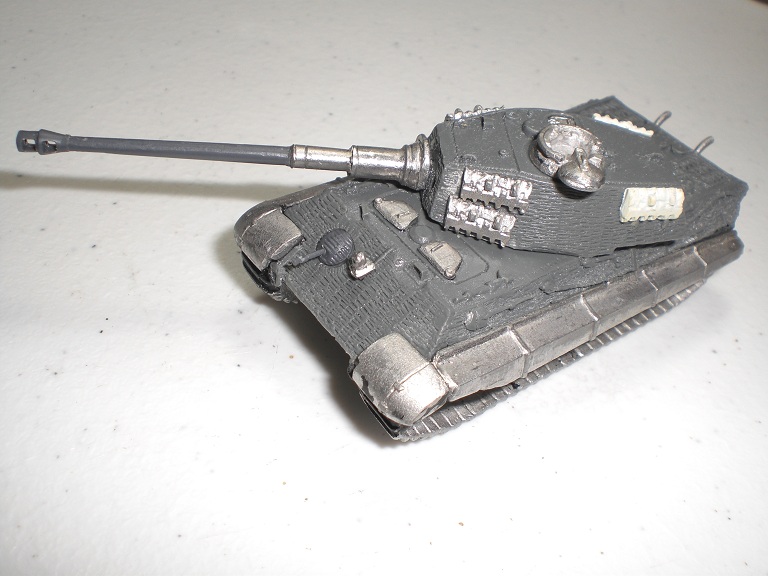
Last up is the King Tiger you see behind the staff car. This is my first KT and I just love the model. It is such an awesome looking tank but for some reason it just doesn't look as scary when you put it next to a Panther which is pretty much the same size model. You can see the converted to plastic barrel from one of my previous posts, plastic hull MG from the Panther kit, and white track links. I reheated the mold of stowage I had cast in previous posts and made a cast of the track links for the KT. I think it could be better but I'm hoping some paint will make that happen for me. I am still undecided as to what paint job I will be using for my Germans. As of right now I am leaning more towards generic grey as opposed to building an army based around a specific unit. It isn't flashy but it is something you don't see often, if ever, and I don't have an airbrush to do the 3 tone paint job everyone else and their mom does.


Later!

18 June 2012

New Panther G Models

Despite not playing Germans, I was so excited by how great the new Panther G platoon box looked that I preordered one and then impatiently waited for it to arrive. When it did get here, it was like freakin christmas or something. I tore into the box and laid everything out and that is when the nightmare started. First, two of the tanks had their exhausts broken off. One of them was just the exhaust tips broken off and the pieces were not present in the box so now one of my tanks has no exhausts. I have filed at least 5 customer service claims with Battlefront since March and am leery of them thinking I am taking advantage of them so I did not file a claim on these models. The other tank's exhaust was completely broken off but it was a clean break and the piece was present in the box so it glued on nicely. Upon doing an inventory I then realized that every single piece of metal that was supposed to come with this kit did not get packed into my box. That was too much and I filed the customer service claim. They explained that all the metal parts come packed in a baggy which explained why I didn't receive any, magnets included. Shrugging off the initial disappointment, I set off on an adventure to get the tanks assembled. They go together extremely well and look absolutely fantastic! I am nearly blinded by the beauty of the tracks. What a great looking tank even if my home cast tarp from the previous post might be a bit big for the turret.


And that's when the real problems at least for me started. The tracks. Either they are simply way too wide or the part of the hull that hangs over them isn't wide enough. I didn't know that panther tanks tapered from the back to front either but they sure as hell do on these models.


Notice how at the rear of the tank you cannot see tracks but as you get to the front of the tank near the fenders you can see tracks? One might think this is not a big deal. Well that "one" also probably doesn't want to attach the skirts to their tank either. The skirts should be flush with the hull, not touch the tracks, and should be vertical or ever so slightly angled. The problem with this cast is that you cannot mount the skirts the way they were meant to be mounted without using a hell of a lot of filler putty (that I currently do not have available in my hobby supplies). The alternative is to mount the skirts at an extreme angle like the following.


Those are pics with the skirt sticky tacked on. I will NOT be building my lovely tank like this. How atrocious. Here are a couple of pics of how it should look but with the very obvious gap near the front fender.


I went to BF's website and looked at their web article. Sure enough they have the same tank with the taper in the hull and of course do NOT have the skirts attached because they CAN'T attach them without excessive modification.

I added the straight red lines so you can clearly see what straight is and that their hull tapers at the front leaving the gap. I then noticed on the assembly pictures that they did have one with the skirt attached and you can clearly see a gap at the front near the fender.


I then decided to look at some of their other pics and looked at the box and made what I think is a shocking discovery. They advertised their new panther g tanks right on the box art with their old metal panther parts. I couldn't freaking believe it. Just look at this picture for my evidence.


This is the picture provided on their website and the box. If you look closely where I have made the circles you can see several glaring inconsistencies with the models I have received. First look at the gun barrels. All of the black markings are holes but they are inconsistent with eachother. The new panther kit has plastic barrels so all of the holes should be identical. These are not, so that leads me to believe they are the old metal barrels with the holes individually drilled out. Next look at the hull MG on the bottom right vehicle. It looks nothing like the hull MG I received in my kit which you can see in my pics above. Why? Because it is the old metal hull MG. Next and most importantly look at the right fender area. What do you see? You see no huge gap between the hull and the skirts and that the skirts are mounted vertical the way they should be. Next you can also see that the fender light is thinner at the base and doesn't look like a glob of plastic like the over-simplified plastic fender lights do. What does that mean? It means that the fender is the old metal one and that either the hull is straight the way it should be or the track isn't too wide to interfere with the skirt. Lastly, I forgot to mark it but have a look at the tracks themselves. The details on them are nowhere near as good as the new plastic tracks have. They aren't even in the same book let alone the same page. They are obviously the old metal tracks which are thinner than the new plastic ones.

Based on this information I have deduced that the plastic parts included with the panther g box set must have been a last minute decision due to all the whining on the BF forums about how Zvezda or Plastic Soldier Company are so great and that BF should follow suit or those people will continue to buy from other manufacturers. This box has been my greatest disappointment yet. I cannot believe that a company with such excellent customer service would deliberately sell a misrepresented product to its consumers. I expect these shenanigans from other companies but not one like BF. I am deeply saddened by this. In closing I would like to share one last picture that sums up how I feel about the new panther g platoon box despite how wonderful the sculpts are and how easily they went together.


Coming Soon - Spetsnaz platoon (my first fully painted FoW models seen above the AR-15)