Showing posts with label F-16. Show all posts

25 October 2013

F-16I Sufa version 11teen.1octember.toomuchpaintonthisthing.326 FINAL

NO MORE SUFA. It's done done. Like DONE done. Really sick and tired of repainting it trying to get colors down just right.

I took the neon green and whitened it to very close to the pastel green used on the actual aircraft.

I took the tan and used Vallejo Buff which is nice and light but nowhere near as yellow as whatever color I used before.

I took the brown and used Vallejo Flat Earth from their panzer color line which is a lighter brown than before but more importantly has a red tint to it. This change right here is what really tied the whole aircraft's paint scheme together. And here I was worrying about the green the whole time.

I changed the canopy colors to what looks like a more realistic scheme to me. I took dark blue and gently wet/drybrushed blue onto the raised areas and then glossed it. I also changed the color of the canopy lines from black to dark grey so they didn't blend in as well.

Finally, I painted over the IAF roundels and put new larger decals on which really makes the model pop.


12 October 2013

F-16I Sufa 100%

Changed the green. Added decals. Dull coated aircraft and gloss coated the canopy. She's as done as I can make her. As normal, the camera is washing out the color and picking up every single mistake the human eye can't even see.


02 October 2013

99%

The F-16I Sufa is probably about 99% complete at this point. All I need to do to it now is glue in the magnet, apply decals, figure out what I plan on doing for the extravagant tail design, figure out how to paint the windshield, and maybe possibly change the color of green I used because I almost hate it. I matched these colors as close as I could and failed miserably. The tan is too yellow. The brown doesn't have enough red in it. The green doesn't have enough green in it. And the light gray doesn't have enough blue in it. I'm as irritated as I am jubilant for finally getting to this point.

The camo pattern is hand painted to the best ability that my shaky hands possibly can do it. The brown is English Uniform (Vallejo 921), the tan is Beige (Vallejo 917), and the green is Pastel Green (Vallejo 885). The light gray is Blue Gray Pale (Vallejo 905), and the dark gray is a drop of Blue Gray Pale mixed with a drop of black.. The LGB are a drop of Yellow Green (Vallejo 881) and a drop of English Uniform. I painted everything on and then gave it my own wash. If you look back at my previous pictures of ground units you'll notice that I'm using Sepia Ink (Vallejo 091). This ink is nice but it darkens everything. So I looked online for a wash recipe and mixed 4 parts water to 1 part Pledge floor polish and then dumped most of the Sepia ink into the container with a splash of smokey ink to darken it a bit. This wash is wonderful and should hopefully cut my painting time on ground vehicles in half if not more.

Anyway without further delay, I present the nearly completed F-16I Sufa conversion. I took two sets of pictures because I suck at photography. With flash shows detail better but washes out the color pretty badly. For instance, with flash makes the green look more like a sandy tan. Without flash, the green shows up as green but the model is too dark to see much else. I am including both sets of pictures here to give a general idea about the quality. Praise and criticisms welcome. This labor of love has taken me weeks from start to finish and I am glad to have finally [mostly] finished her.


Coming soon, WWII era United States Navy!

28 July 2013

F-16I Sufa Project on Hold

Well I slapped some primer on her and with that, I've taken her as far as I can for now. I want to do the 3 color pattern which is dark brown, light brown, and pale green. The belly will be light grey and the nose will be dark grey. So that's 5 colors I need that I do not have and I'd still need to buy some Israeli Airforce decals to complete it. I resume the hunt to find full time work tomorrow and failing that I have staffing agencies I can utilize.

Hope to treat you guys to the completed project sooner than later! Until then, I'll get back to these M113s so I can finish them up and move on to the Namers.


27 July 2013

Project Nearing Termination!

So freaking excited right now. Today was a long day of working on this thing, drinking lots of dew, and smoking lots of cigarettes.

Pulled everything I sculpted off the aircraft and glued it all in place.
More detail sanding.
Attached remaining payload.
Hand made second drop tank since my duplication attempts proved unsuccessful.
Glued the pylons I stole from the Mk82 clusters onto the drop tanks.
Glued the drop tanks in.
Cut and filed a couple of nails to use as the Amraam-120s.
Moved the AIM-9s under the wing next to the GBU-16s.

I love it! It could be so so much better especially if GHQ would just make modern F-16s or at the very least, make a modernizing kit people could buy for their current F-16 model but as I've stated, this was my first ever attempt at sculpting and now that the payload is completely on this thing looks FIERCE. Ready to kick some Hezbollah ass.


No Sleep Til Sufa

This is one of the few instances where I am happy that I have not been able to find full time work around here. This thing has absolutely consumed every waking hour over the last few days. I have learned a trick to speed things up though. I read on the packaging for my kneadatite that if you have it under a warm lamp it speeds up the curing process and if you freeze it it stops the curing process. So now any time I make something and don't feel like waiting, I toss the model and or part I made into the toaster oven, set it to convection, and have the temperature setting set to about 100°F to 120°F. After 10-20 minutes in the toaster oven, the part is ready to be sanded, cut, drilled, fed to my cat, whatever and since the melting point of pewter is around 450°F there is no chance of anything melting. I would obviously not recommend this for plastic miniatures since even a lamp gets hot enough to melt it but this is a non-issue for me since everything GHQ makes is pewter or whatever white metals they use.

Anyway I did some more fine sanding to the plane and trimmed up the nose part just a little bit. I stuck on the AIM-9 missiles and the GBU-16 LGBs and that's when I realized that trying to fit a pair of Amraam-120s in might be folley. GHQs ordnance is kind of chunky so there isn't much space under the wings to fit the 4th hardpoint. Unfortunate but I might just have to scrap the idea of adding Amraam-120s or HARMs to this model.

The ordnance also comes with some Mk82 dumb bombs in clusters of 3. I had no intention of using these so I cut the bombs off of the pylon in order to use the pylon to attach  the drop tanks. As I tossed the scrap metal aside I realized that I had cut off one perfect bomb from each pylon. I had a eureka moment and realized that these would be useful. I cut the tails off and glued them to either side of the engine intake. BAM. Instant optics. TAG and whatever the other one is. Looks pretty cool if you ask me.

On to the drop tanks themselves! I took more scrap metal and glued two nails to it. I then coated the nails in the lubricant I've been using, grapeseed oil I happened to have already for cooking, and then I stuck kneadatite on them. I coated my fingers in oil and gently massaged the putty into the shape I needed. After baking the drop tanks for 20 minutes they were ready to be sanded. One turned out perfectly. The other looked like it had been hit by a bus. I pitched the shitty one and did some fine sanding on the good one which you can see in the pics below. Rather than attempt to make another perfect one, I think I am going to make a mold of it and cast two drop tanks from the mold instead. I havn't decided whether I will cast them in kneadatite or two part casting resin but both are an option for me. In retrospect maybe I should have made molds of all the parts I made for this plane? I doubt I'll ever want to make another one again unless I had the parts readily available.


26 July 2013

CFT v2.0

Woke up today and realized that while the CFT I sculpted last night looked pretty damn cool, it was extremely exaggerated and shaped completely wrong and I hated it for that. I pulled it off the jet and took this opportunity to do some sanding on the dorsal spine to thin it up just a bit.

After studying about 50 different pictures of F-16Is I went ahead and did the easier part of the project and sculpted the nose a little bit. The GHQ model is pretty much flat on the underside but the F-16Is nose is rounded below the wing and this rounded area extends back a bit behind the engine intake. It looks a little too beefy so I might end up sanding it down a little bit more.

I then did some practice sculpting with clay to try and get a feel for how I wanted the CFTs to look. After an hour or so of that I started doing the actual sculpting. It took me about 3 hours to get the first one right and then another 2-3 hours to get the second one to match the first one. This was an absolute headache. I don't know how people out there sculpt this kind of stuff but I guess practice makes perfect and they sure seem to have a shit ton of practice.

The model is far from the perfection I had envisioned for it and it isn't quite symetrical but this is going to have to do. I am at the limit of my abilities to do any better than this. I already have probably 20+ hours invested in this thing and I still have another 2-5 hours to go I think before I can even get the primer on.

Up next is the 600 gallon drop tanks. Attach the AIM-9 missiles. Attach the LGBs. Maybe attach a center drop tank and a targeting pod for the LGBs. And maybe modify the model to go from 3 hardpoints per wing to 4 hardpoints per wing in order to accomodate a pair of amraam-120 missiles.


25 July 2013

F-16I Sufa CFT Attempt

Got the first CFT sculpted onto the F-16I. The shape is nowhere near perfect but then nothing I've sculpted on this model so far is. It's such a small scale to get just right. Will have more pics tomorrow when I finish the other CFT, the nose, and the pylon mounted drop tanks.


2Aircraft1Tank

Well I've gotten the attack helicopter built. Once again GHQ delivers superb quality and detail. I've looked around at many many other manufacturers of 6mm scale models and I honestly don't know how any of them stay in business. Their models just can't hold a candle to GHQ's. This is a similar situation to when I played Flames of War where I only bought figures from Battlefront because the quality in my opinion was worth the extra expense.

Here is the AH-64D Saraph. Paint is a long ways off as I do not have the proper colors for the IAF. Note that the doodad that sits on top of the main rotor fell off so I have to figure out a good way of securing it. Probably going to need pinned although I have never pinned anything before so it'll be new to me.


Next up is a test Merkava Mk IV. Nothing special here. Just a magnetized turret and custom antennae. The antennae were made by using the bristles from a $1 black paint brush from Walmart. The synthetic ones you'd paint your house with. A $1 brush has enough bristles to give like 100-200 tanks aerials. I felt this was a better option than some of the other ideas I've seen kicked around such as piano wire. The bristles are flexible so you're not having to bend anything back in place.


Finally, I bought a GHQ F-16. This model was chosen to become an extensive conversion project to change what appears to be an early model F-16C (Block 30?) into a modern Israeli F-16I Sufa. The only F-16I Sufa currently available in 6mm anywhere is a model on Shapeways at https://www.shapeways.com/model/327961/1-285-6mm-f-16i-sufa.html?li=productBox-search&materialId=62 . That's all good an dandy but I worry about the detail and the material the model is made of. There are no panel lines to speak of and all details must be painted on. The other downside is that that model isn't even an F-16I. It's just an F-16 with CFT (conformal fuel tanks) which aren't even shaped accurately.

What sets the F-16I apart isn't just the use of the CFT but also a modified cockpit that utilizes a crew of 2 instead of 1 and an interesting dorsal spine that runs from the cockpit to the aft stabilizer. Go easy on me with this model because it is the very first time I have ever modeled anything with kneadatite. I've always wanted to play with green stuff but just never had a reason to use it. So far I've gotten the extended cockpit modeled and just finished doing the preliminary work on the dorsal spine. I've gotta wait a day for it to fully cure so I can do some detail sanding on the spine and reduce its size slightly. It also needs to be a bit more teardrop shaped and remain wide in the middle while tapering at either end. I gotta say though, for my first time ever sculpting anything, I am fairly proud of myself.


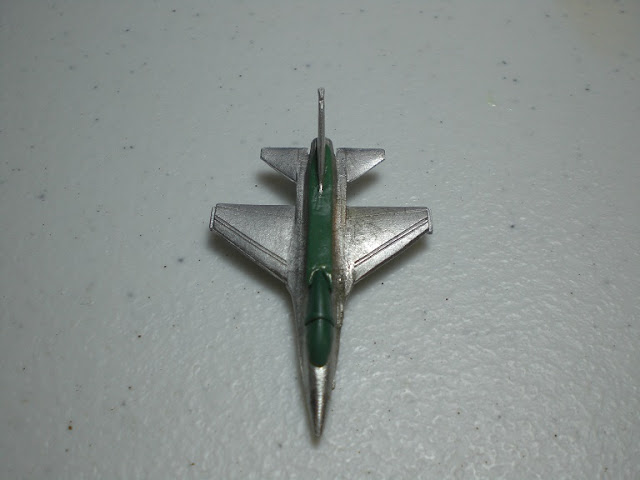


Up next are the CFT which I am absolutely dreading. They are curvy and I think it is going to be very difficult for me to get them just right. After that I will add some kneadatite under the nose to round out the bottom a bit. The GHQ model is nearly flat under the nose and I don't know why that is but the F-16I is rounded. Finally, I will take some of the bomb pylons the model came with that I will not be using and I will cover them in kneadatite in order to model the 600 gallon drop tanks that many Israeli F-16s use. Having a whole hell of a lot of fun in this GHQ stuff so far.

If you're interested and you chanced upon this blog because of my Flames of War stuff, check out GHQ at http://www.ghqmodels.com/