Well anyone that has been following the Panther G drama knows that I have been whining and crying like a little girl about the one thing about them that I didn't like, the skirts not being able to be attached. For me, it was a huge enough issue to ruin the entire set because the only reason I bought them was to have panthers WITH skirts and NO zimmerit. Anyway, I have created a tutorial to show you how to get them to look good with the skirts. The first tank took me maybe 3 or 4 hours to do but this second one I did for the tutorial maybe took me an hour and a half. Beware, this tutorial is long winded and thorough.
First you will need a Panther G, a super sharp hobby blade, some filler, super glue, and some patience. I have converted many things in the past but I am what I would consider a barely competent modeler so care needs to be taken in this tutorial or you will stab yourself and bleed everywhere. I can in no way be held responsible for anyone injuring themselves while using this tutorial.
I would not trust your standard hobby blade. I went to Walmart and in the arts and crafts section for a couple of bucks they had these special blahblahadmium coated blades that are supposed to stay sharper longer. I tried them out and not only do they stay sharper longer, they are SHARPER. I accidentally dropped one while sitting down and it stuck into my thigh! Don't you stick that knife in your leg Ricky Bobby.
Now it would be better if you didn't put your tank together. If, like me, you were one of the first people to get these, then you already put them together and must now rip the tracks off. Do that now. Don't worry if you break the backing on the tracks but worry if you break any part of the tank so be gentle and increase force until it gives way.
Again, if you are working with an unassembled tank, skip this step. If you had to rip your tracks off go ahead and scrape the superglue off the hull or use a dremel to grind it off. The flatter the better.
Now take your tracks and lay them so the outside is facing you. Take your hobby knife and carefully score the backing by gently pulling the knife along the top of the tracks. Keep doing this adding more and more force each pass until the upper backing has been trimmed off.
You should now end up with tracks that look like this.
Now we are going to remove the rest of the backing. First you will need to locate the nub at the front of the track. This little nub is all that will remain on the tracks to help you align them correctly on the hull so it is imperative that the nub remains intact. Take your knife and gently push down next to the nub to cut into the track backing. The cut should be as deep as the backing.
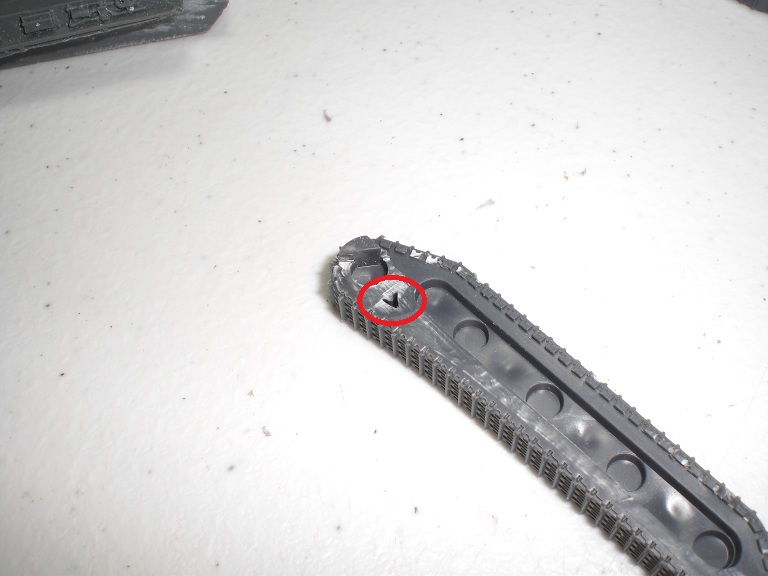
Next stand the track up so you are looking at it from above. You can clearly see a mini trench running in between the backing and the track you want to keep. As with the other part of the backing above, gently drag your knife along the plane you wish to cut to score it, using the tracks as a straight edge reference. I have marked it in red. Do this along the entire track but DO NOT cut off the nub.
Repeatedly drag the knife along applying more and more force until the backing begins to give way. As you get closer to the nub at the front of the tracks it would be smart to be much more careful and gentle about what you are cutting away.
At this point I have removed the vast majority of the backing but observe how the nub is still intact! When you get close to the nub it is best to use your thumb to push the blade into the material you want to remove and to remove less material at a time. By doing this, you maintain perfect control of your blade and will not cut off the nub or turn your finger into a nub in the process. Notice my nub is intact but there is quite a bit of backing left around it. That part comes next.
Okay now you will take your knife and push it with your thumb along the backside of the track to remove material and get it to be flat and level. The flatter and more level you can get it, the better the track will attach to the hull later. Just be sure not to remove too much material and ruin your track.
Notice how at this point I am shaving off material rather than really cutting or gouging it off. This is the detail portion of the conversion.
Near the nub you are going to want to shave off enough material until a hole appears. This hole will appear between two road wheels on the outside face. When the hole appears, you have completely removed the backing here and are guaranteeing a flush fit to the hull.
If you look at your track from above you may be able to see some imperfections still. At this point take a hobby file, a dremel tool, or fine grit sand paper and smooth the surface down to get it as flat as you can.
The track is now ready to glue to the tank. Here is the before and after of the left track.
Do a dry fit to the hull to make sure the track is not visible from above the tank at the rear. The tracks will stick out at the front and be visible because the skirt brackets on these pre-remastered hulls are deformed, hence why we have to go through all this.
Now glue the tracks on but keep in mind that because you removed the backing, the track will not have only one way to fit on. Align the nub with the nose of the tank as normal but at the rear of the tank you will have to manually provide a gap between the top of the track and the bottom of the hull.
As long as the hull looks about parallel with the flat bottom of the track the tank will come out looking good and not look as though it is tilted forward or backward. After I glue the tracks on, I like to flood the bottom with superglue just to be sure. Since you removed a hell of a lot of the material used to glue the tracks on, I regard this step as a necessary evil to prevent breakage in the future.
Next glue on your fenders.
Since I am gluing on my skirts prior to painting, I like to prime the bare parts that will be hidden with thinned Vallejo Black. I would advise puting the skirts on now since you may ruin your paint job if you attach them later, or at least need to redo some of it.
NOW GLUE YOUR SKIRTS ON!! We're almost done and now you can start to reap some of the benefits. Glue the skirts on so they are flush with the rear end of the skirt bracket. This will cause part of the skirt to be glued directly onto the fender. This is good because not only will this strengthen the fender in the long run but also provides the frontal contact point for gluing so that the skirt remains stable during the next steps. Note how gluing the front to the fender also creates the gap I bitched so much about. This is good. Before our modifications it was the tracks creating the gap. Now, the fenders properly cover the tracks.

Next grab whatever you have for filler be it hobby putty, green stuff, contour putty, or whatever. I don't have access to hobby stores so I use Walmart for most of my hobby stuff and don't pay the markup you may pay for "specialized" hobby products. Many hobby products are simply common cheap products that have been rebranded for hobbyist use. I am using a $3 tub of drywall spackling.
Using whatever you feel like, apply your filler into the gap. Make sure you put enough in to span the gap and maybe go down into the gap just a tiny bit to ensure there is enough material there. Take care to not get too much of the stuff on other parts of the tank because you will have to scrape it off next.
Now use a knife or something to scrape off the excess filler. I did this after letting it dry for about 10 minutes. In that time it is still soft but not brittle so I can remove excess without chunking some out of the gap. If using a knife I like did to scrape, hold the blade perpendicular to the track so that you aren't accidentally cutting anything off.
Next I like to put superglue on the filler after it has dried for maybe 20-30 minutes. You can skip this part if you like but it has two purposes. First it seals the filler and makes it rock hard. Second it creates a nice smooth flat surface not too unlike the surrounding resin which makes the repair look more natural. If you're unsure about this, try it out on something else and you'll see what I mean.
YOU'RE DONE! Finish up the build by gluing the rest of the tank together and attaching whatever bitz and gubbinz you feel like sticking onto it.
After priming, this is what my first tank looks like. I hope someone finds this information useful and I hope Battlefront learns their lesson. I realize this is a total pain in the ass but at least you can salvage this kit.
Thanks for looking!