Havn't posted any cool stuff in a while so I thought I'd give any readers or accidental visitors a quick heads up. After AGES of searching I have finally found full time employment and started on 2 JAN. The job involves working outdoors and as such is weather reliant. Lately here in the panhandle we've been getting some arctic blasts as some may have seen on the news but basically right now I work when I'm needed for how long I'm needed. Once things chill out and we get back to a normal schedule I'll be working (or predisposed for work) 12 hours a day 4 days a week but that can increase up to 6 days a week.
Basically I have had almost no time to myself lately. I'm still in collect mode picking up ships, 6mm Israelis, and 15mm US moderns when I can. I plan on ordering 4 of Khurasan's M1A2s soon and my box with 2 Italieri UH-60 choppers from Poland has cleared customs and should be here next week.
I'm hoping to post up a battery of Soltam artillery within the next month. I have all the stuff I need to make the conversion (Soltam have 4 wheels per piece whereas the US counterparts have 2) but I was waiting on suitable artillery crews since GHQ makes no modern crews. I ended up just ordering their WWII Russian arty crews. I will make it work. Once I get organized and am able to budget my time and money better I am hoping to do a steady release of things as I sort and then prioritize all of this metal.
Thanks for reading and I hope to have some more eye candy soon.
02 February 2014
03 December 2013
GameCraft Furniture Review Followup - More Happy Fun Time
If any of you read my previous review of the furniture that Allen over at GCMini makes (http://store.gcmshop.com/) you'll notice that I ranted and raved near the end about a shelf for the paint bleachers that wasn't available at the time of my purchase. He makes two versions of the paint bleachers happy fun time shelf.
Version 1 here http://store.gcmshop.com/p/1981/shelf-unit-for-paint-racks-version-1
Version 2 here http://store.gcmshop.com/p/1982/shelf-unit-for-paint-racks-version-2
Well version 2 arrived last Wednesday but I'm only now getting around to building it tonight due to the holidays and the gluttonous fat laziness that followed.
First of all, this is a very simple piece not only in design but in function but how it does that is the real beauty of it. It not only utilizes space already occupied by his paint bleachers but creates space above them. Desktop space comes at a premium and when ordering some paint bleachers for yourself you should definitely consider adding the happy fun time shelf to the order.
Secondly, I built this piece with thick CA glue instead of the 2 minute Loctite wood bonder I used on all of the other pieces. The bonder was a wonderful glue but it expands when it comes into contact with air so that required a significant amount of cleanup after assembly. It's just easier to use CA glue even if you have to hold the parts together a bit longer.
Lastly, function. What can you use the shelf for? Well I bought some more Vallejo paints and have filled my paint bleachers to maximum capacity. So until I order another one, my extra paints will sit on the shelf. I have also moved some critical bitz boxes onto it and used the top shelf for some really tall bottles of Elmer's glue (I love Elmer's glue! Ever spread it all over your hand, let it dry, and peel it off? Yeah, I never grew up). I intend to fill the shelf up with bitz boxes and Lifecolor paints once I've bought them.
So in short since the paint bleachers are my favorite piece, by proxy the shelf that goes around it is also my favorite piece. I should probably mention that Allen also sends some hard candies with his orders (at least lately) and not only are they tasty but somewhat nostalgic at least for me. Now we just have to get him to replace the cinnamon or peppermint with some butterscotch :P


He's made a lifelong customer out of me and I'll be review more of his products as I can afford them. I am eager to do up some of his buildings and I've caught whispers of things everyone except me wants that I will probably end up buying just to show off.
One last thing. I accidentally bought some 15mm Israelis for the new Fate of a Nation supplement from Flames of War. If I was spread thin before, I'm doubly so now.
22 November 2013
Freakin Sharks with Freakin Lasers on Their Heads
Today I've got a super happy fun time product review from two companies.
First up are some bases by Litko at http://www.litko.net/. Using their basemaker app you can have custom designed bases in circles, squares, ovals, and pill (similar to Flames of War bases). I needed circles for my 6mm Israelis and decided to ignore the suggestion for 1" bases since a Merkava will not fit on a 1" base. You can get your bases made in different colors of acrylic or in MDF board and in different thicknesses. I picked up 100 1.25", 50 1", and 25 1.5" bases in 0.8mm thick MDF. Infantry will be mounted on the 1", vehicles on the 1.25", and larger vehicles and artillery pieces on the 1.5". I got all of that for about $45 after shipping but it's custom made to order so I had to wait almost 3 weeks for them to arrive. Nowhere near as fast as Shapeways but I'm happy with their product and my purchase. Will be buying more.


Next product review is much more exciting. If you head over to GameCraft Miniatures at http://store.gcmshop.com/ you can find not only one of the largest and most unique collection of buildings and terrain accessories for sale in various scales but tabletop hobby furniture as well. Now I am one hell of a messy dude. For me it is an ordered chaos. My desk may appear to be a complete disaster but I know where everything is...most of the time. It's those few times that I didn't know where I set down my hobby knife at that drove me crazy. Here's what my desk looked like before I bought Allen's products.

You can see I've got models in various degrees of completion being worked on, glue, bitz boxes, cat combs, a cutting pad/work area, paints completely in my way, my wet palette, dremel tool, tape, rulers, files, knives, clippers, tweezers, a lamp covered in magnets, and a kitchen sink. This is ground zero of the nuclear disaster that is my miniatures factory and I needed help bad. So I bought 3 pieces of furniture from GameCraft.
First up is what I call happy fun time corner at http://store.gcmshop.com/p/1769/paint-rack-45-degree-inside-corner. It is a small utility rack with a 45° angle. You can put your water dish, brushes, files, knives, glue, and whatever else you can think of that fits in it. Love this piece especially for the water cup slot which will reduce spillage not only from me but from my cats should one be stupid enough to forget how fearful they are of the noises I make when they get on my table.

Up next is the happy fun time desktop organizer found here http://store.gcmshop.com/p/1766/workbench-organizer-org001. This thing is extremely useful for its size. I have shelf space on top of it for larger paints and homemade washes, my dremel tool and its accessories, bitz boxes, and the damn thing has drawers (DRAWERS!) to put whatever you want in them. I have my clippers and tweezers and things in one drawer and some hobby putty in the other. Another benefit of this piece is the space beneath it is also useful. That's where my wet palette goes and some of the larger things like scissors and rulers and such. This is the only piece out of the 3 that I've cleaned and painted so far.


The last piece I got is what I call the paint bleachers and it is hands down my favorite of the three. You can check it out here http://store.gcmshop.com/p/1768/paint-rack-unassembled-kit. This thing is AWESOME. It is made to fit right up alongside the happy fun time corner and all of your paints fit on it in clear staggered view for easy color selection. This thing was the most important piece I got because my paints are always in my way and I end up just shoving a pile of them around which results in several being knocked over which I hate. The best part about the bleachers? The holding area is cut specifically to hold YOUR BRAND OF PAINTS! I'm a Vallejo guy so I ordered that one and it holds 43 Vallejo paints. Don't like Vallejo? Pick one of these up in any of the following sizes,
32mm (1.26") fits Testors Model Master (Acryl and Enamel) and similar sized bottles
34mm (1.34") fits Games Workshop Citadel .4 oz (12ml) bottles*
36mm (1.42") fits Tamiya's 10ml bottles and Polly Scale and Floquil sized bottles
40.6mm (1.6") fits Tamiya's 23ml bottles
Outstanding. I will definitely be picking up a second paint bleachers but I think I need a bigger hobby table now.

I got all three pieces I think for just over $70 shipped. Well worth it. You can spend more to have them shipped to you pre-assembled and pre-painted but I actually had fun putting them together myself. No instructions included but once you see the pieces getting them together is really a no brainer. A 20 piece puzzle would be harder to figure out.
But wait, when I ordered these wonderful items there was a FOURTH piece that wasn't available. I think it's new because I really doubt that I would have missed it and now that I've seen it, I have to have it. It's a super happy fun time shelf for your paint bleachers which you can check out here http://store.gcmshop.com/p/1982/shelf-unit-for-paint-racks-version-2.
Give his products a go. They're all awesome and I now have about $3000 worth of his terrain just sitting in my shopping cart waiting for me to win the lottery or find someone stupid enough to give me a credit line that high. Hope you guys found this review entertaining and or insightful!
Oh and I almost forgot! Here's how my desk looks like NOW!

14 November 2013
Shapeways Italian CV Bonfiglietti
I ordered the 1/2400 Bonfiglietti on the 10th. It arrived on the 13th and they gave me overnight shipping even though I paid for 2 day shipping. I can't imagine this being the norm for them since I was quoted at a 10 day arrival time.
Anyway here she is in frosted ultra detail.

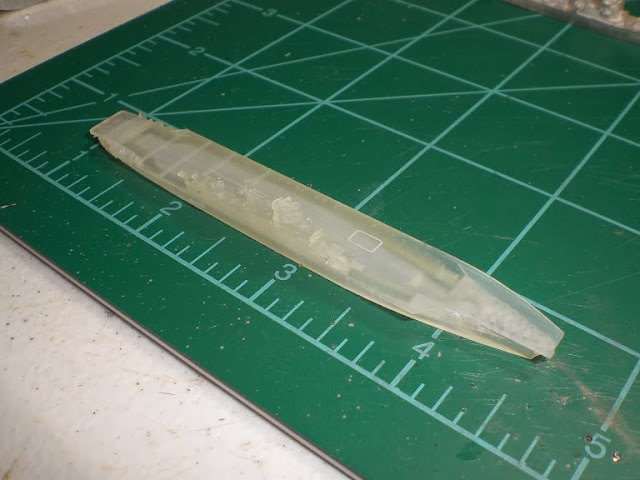
The details are actually pretty nice and she measures in at just over 3.5 inches. One thing about the material it is made of though, it is extremely hydrophobic. That is, it repells water like nobody's business. This thing has ended up being a real pain in the ass to paint. Here she is primed.


I've screwed up on her. First, I put the primer on too thick. Second, the light grey paint I put on the hull didn't want to take and it ended up getting layered several times until it was too thick and started cracking in several places. This also resulted in the holes on the side of the hull getting filled in. Here she is with the basic colors, wash, and matt coat applied.


It's such a beautiful ship but I have royally fucked up the paint job I think. Now that I have knowledge of working with this material, I think I may end up buying another one because I know I can do better than this dreck. Regardless, I'm going to finish her up anyway and the camouflage is being applied right now. Since this ship never existed I can do whatever I want to her. She will have the same jagged black markings with white and light blue like other Italian ships. I will also do the nose in the red/white stripe.
**Update**
Using my advanced MS Paint skills I have drawn up a possibility for her camouflage.


I think I like it.
**Update 2**
And disaster Hindenburg style. I put Tamiya painter tape on to start getting the camouflage down and the paint ripped up with the tape. This obviously isn't supposed to happen. All of the perfectly straight hull lines on my USN ships are painted using this exact same tape. So either the paint isn't sticking properly to the primer or the primer isn't sticking properly to the model. So I whipped out my trusty dremel tool with the brush head and started removing ALL of the paint from the model. Got about half way done before it died but I need to just start over with this model and reclean it and figure out something. I've read coating it in Pledge acrylic floor shine prior to priming works but I'm going to be honest here. I am thinking my best bet may just be to try and make a mould of the ship and then cast it in some 2 part liquid resin that I have lying around from last year. I am NOT a fan of painting this UV cured plastic.
10 November 2013
USS Montana Christened!
GHQ Micronauts 1/2400 scale Montana Class battleship.
I finished her up just in time for Veterans Day tomorrow. Thank you all for serving by the way.
I changed up my technique a little bit with this ship and I think it turned out better than the previous ones but I still need a lot of polish. This was a fun model to do. Enjoy.


I finished her up just in time for Veterans Day tomorrow. Thank you all for serving by the way.
I changed up my technique a little bit with this ship and I think it turned out better than the previous ones but I still need a lot of polish. This was a fun model to do. Enjoy.


An End and a New Beginning
On 07 NOV 2013 my precious 9 month old kitten, Callisto, was euthanized to end her pain and suffering. She had been battling with an uncommon but 100% fatal disease called FIP since 21 OCT 2013. She was perfectly fine then all of a sudden she was swept into a downward spiral until on the morning of the 7th, after finding a puddle of bile, I realized that no amount of drugs were going to save her and that her organs were already shutting down. Rest in peace Callisto. You were the best thing that ever happened to me.

Apparently when I'm depressed I spend money. So I've got a whole fleet of WWII Regia Marina ships on the way. Because of this, I also made my very first purchase on Shapeways and bought a 1/2400 CV Bonfiglietti as seen here https://www.shapeways.com/model/489653/1-2400-it-cv-bonfiglietti-1932.html?materialId=61&li=ostatus. I got it in frosted ultra detail so I'm hoping it turns out crisp. The order has cleared processing/inspection and is now in production. I am eager to post up lots of pictures when I get her because there is a 1/2400 Lexington Class battlecruiser on there I have been eyeballing for a while.
29 October 2013
Nemmera ARV Conversions
I've finished most if not all of the work on my Nemmera armored recovery vehicles. These vehicles do exist today but I think they are in prototype stages. They are based on the Merkava MkIII chassis. Here are a few of the best (and only) pics I can find of the actual vehicle.
The crane.

The spare power pack on top. This is the only photo I have ever seen that shows the power pack clearly.

The rear end.

The rear end in action.

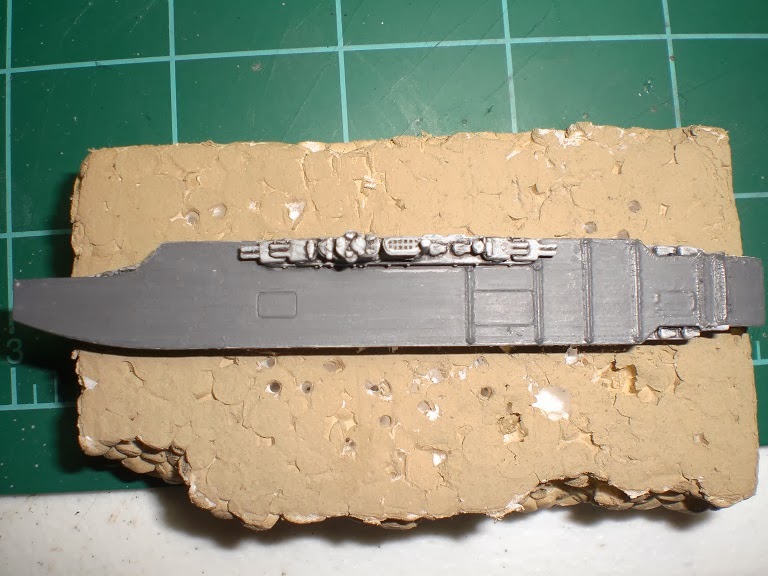
And here are the vehicles I created with a Merkava so you can see the start to finish. Green parts were made by me using green stuff putty. White parts are drywall putty. Off-white parts such as the power pack and hatch on top were cast and then parts made from Steel Putty from Walmart (see previous post in 2012 for info on those products). And silver parts are GHQ products. The hull is the Merkava MkIV and the crane and winches are from the AARV-7 Command/Engineer pack from the US line.


The crane.

The spare power pack on top. This is the only photo I have ever seen that shows the power pack clearly.

The rear end.

The rear end in action.

And here are the vehicles I created with a Merkava so you can see the start to finish. Green parts were made by me using green stuff putty. White parts are drywall putty. Off-white parts such as the power pack and hatch on top were cast and then parts made from Steel Putty from Walmart (see previous post in 2012 for info on those products). And silver parts are GHQ products. The hull is the Merkava MkIV and the crane and winches are from the AARV-7 Command/Engineer pack from the US line.


Subscribe to:
Posts (Atom)